
Scenic. For many churches it is unfortunately a bit of an afterthought. However, we have found that setting the tone for response can begin with great environmentals including the scenic design. We have moved to a 2-3 month rotation for our scenic which allows us to invest appropriately and keep it in place for a significant enough time.
For Easter we decided to go with an arched look and incorporate LED tape for the first time at The Crossing. Our initial meeting with our team centered around the construction of what we now call “arches” and “ribs” as well as the trickiness that LED tape presents. We are fortunate to have some talented people alongside us including a set carpenter who was tasked with the initial design layout and engineering. Here’s the sequence of events:
- Design and construction plans
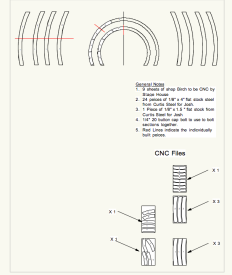


These are the initial drawings that were build to. On the budget we had , the challenge was to do a 50k+ set on a MUCH smaller budget. This would require leaning heavily into skilled volunteers.
Our supply list included the following:
Rose Brand (1) White Sharks Tooth Fabric
15’ 6” x 15’ (5 yards)
Curtis Steel
24- 1/8” x 4” x 20’ Plate Steel From Curtis Steel for Josh
1- 1/8” x 1.5” Plate Steel From Curtis Steel for Josh
Bolts– Need 100 count
Nuts– Need 100 count
2. Plywood backing: The design was sent to a local shop so the plywood could be cut to form. This would serve as the form base for the set. It needed to be cut exactly so the CNC Machine was used to hold the desired shape.
3. Welding and Formation: When we need welding, we turn to Josh, an awesome fireman who serves on our team. Equipped with a couple other key volunteers, they worked over the course of two days to assemble the rough set pieces.


4. Paint: Each frame needed to be painted white in order to create the reflective surface we desired for the LED housing and to reflect the muslin stretch material that would be the final assembly piece. A quick hit with a Wagner power sprayer with a white primer did the trick.

5. Set Deconstruction: Since we were on a tight timetable, our first task Monday of Easter week was to completely strike the stage and remove the existing set. It was a quick de-install since we were using a Mod Scene that was bolted together coroplast. This set would be re-tasked to another venue on our campus and part of the excess we were able to give to a new church plant in town that is in a portable situation.

 6. LED Install: This was the tedious part. Beginning Tuesday am, volunteers began installing the LED tape to the interior of each arch. Two lengths were run on each angle with the tail and power supply positioned on the bottom. Based on others experience, we reenforced the tape with a second layer of transparent tape to make sure none of the LED strips slipped later in the process. We knew our access would be limited once the fabric was stretched over.
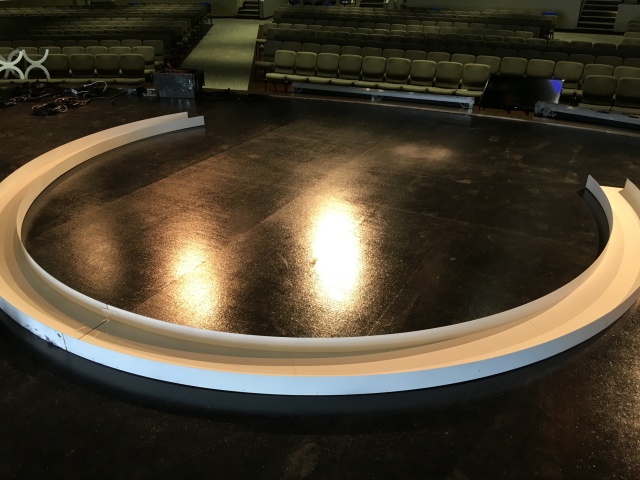
7. Fabric Stretch: With the help of a staple gun and air compressor, the fabric was slowly stretched over each piece. It was not difficult, but very slow because of the angle.
8. Rigging the Arches and Ribs: Two of our main scenic guys were responsible for the actual rigging of the pieces. This was done by stretching a piece of schedule 40 pipe across two of our electrical trusses to provide a rigging point. Note: it was at this point we realized that two of the “ribs” were prepped upside down. This created a crisis that was solved in the rigging process by adjusting the hang points and angle.
9. Scrim: We stretched a pre-ordered piece of grey scrim over the small arch in the center to create a front projection screen. We used scrim vs. a normal screen material as we were intentionally going for the more transparent look. By adjusting light and projection we could create some different effects both on Easter and beyond. Our plan on Easter including the projection of the tomb on this half oval shape people entered the room so this was an important element.
9. Lighting and Programming: Our main LD then took over on Wednesday by getting the DMX of the LED’s into our lighting console and beginning the programming process. This would stretch into Friday evening in bits and pieces as we began rehearsing music, etc.
How did this all happen? Tons of dedicated people with crazy skills and and extreme commitment to the finished look. It was truly a coordinated effort that set our environmental tone for Easter and the next few months.
Final Look: So there you have it. Once we added risers and projection (along with some colorblast LED to wash the back current), we were extremely pleased with the look. Here’s some pics of the final stage.


Pingback: Easter 2016 … The Final Week (Part 4) – The Crossing Creative